Create an effect of a ripped paper

Introduction: In this tutorial I will teach you how to create a torn or ripped paper effect. I created this effect using two types of brushes with different settings. The process was fast and it created a realistic look. If you are having problems feel free to e-mail us, or post a message.

In this tutorial, I will teach you how to create the ripped paper above.
Step1: Setting up work space.
Create a new image using the dimension 800 x 600. Set the background color to #d3d1ba. Create a new layer, Layer>New> Layer… (Shift+Ctrl+N).
Step2: Creating the paper.
Click on the Rectangle Tool and create the image shown below.
background(d3d1ba) | rectangle color #FFFFFF
First, click ripped1 and download this brush set. I included two brushes, ripped1 and ripped2. Install them into Photoshop. Click on the Erase Tool, when you do that on the upper right-hand side of the taskbar you will see this icon click on it and it will bring up the window below.
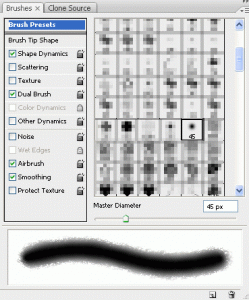
Click on select the ripped1 brush. When you do that the, Shape Dynamics, Dual Brush,Airbrush, and Smoothing should be selected. Click on Dual Brush and add the setting shown below.
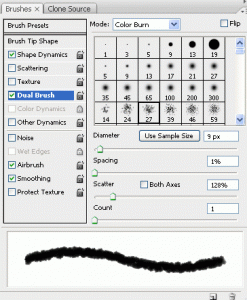
Make sure you select the ripped2 brush in the Dual Brush option. Go to the rectangle you created, using the Erase Tool start erasing the edges of your image until you are satisfied. Below is what I came up with.

Click ripped3 to download this brush, using this brush we will add more effect to the edge of the paper. Install this brush, using the Erase Tool, erase the parts of the ends of the paper to get the effect below.

Right click on the paper layer, click Blending Options and apply the setting shown below.
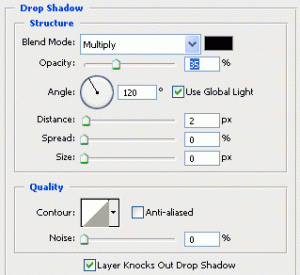
Step3: Creating the paper lines.
Create a new layer, Layer>New> Layer… (Shift+Ctrl+N). Change the foreground color to #6072b5. Using the Line Tool , while holding shift draw three line to get the effect below. You can draw each line on its own layer.

Hold Ctrl and click on each of the line layers and press Ctrl+E to merge them all. With that change the layer opacity to 7%. After doing that you will get the effect below.

You can change the background color to what ever color you want from here.

Finished:
Well that is it, hope it came out to what you expected. If you have any question or comment about this tutorial, feel free to post a message.

